The way to my heart is a bouquet of red roses and a bottle of wine. A very close second is a box of Cinnabon! Today’s recipe is a homemade cinnamon rolls recipe that’s made to win anyone over.
What makes this homemade cinnamon rolls recipe so darn delicious is the cinnamon powder (I use Saigon cinnamon which is more intense and fragrant) in the rolls. There’s also the heavy cream that we pour on top of the rolls and that really gives it the rich, gooey texture that’s so satisfying. It’s then finished with a cream cheese frosting, all made from scratch.
For this recipe, you’ll need a stand mixer, but kneading by hand also works. Be sure to read to the end for pro tips on common dough problems and how to fix them!

Recipe Ingredients
What ingredients do you need for homemade cinnamon rolls?
For the dough:
- Milk – Whole milk or 2% is preferred. Warm to 110ºF.
- Yeast – I prefer using quick-rise yeast.
- Sugar
- Large eggs
- Salted butter – Melted, but make sure it isn’t over 110ºF. Just softened is fine.
- Flour – Bread flour or all-purpose flour. Spoon and leveled.
- Salt
- Heavy cream – For pouring over the risen rolls right before baking.
For the filling:
- Light brown sugar
- Unsalted butter
- Cinnamon powder – Ground Saigon cinnamon
For the cream cheese frosting:
- Cream cheese – Softened
- Salted butter – Softened
- Powdered sugar
- Vanilla extract

How To Make Cinnamon Rolls
First, we make the dough. Then, we mix the cinnamon filling. Once it’s assembled, it bakes, and we make the cream cheese frosting. That’s it – all done!
Step One: Warm the milk to around 110ºF. I like to do this by placing milk in a microwave safe bowl and microwaving it for 40-45 seconds. It should be warm but not hot to the touch (about 105 to 110ºF). If it is too hot, make sure to let it cool before adding to the yeast to prevent killing the yeast.
Step Two: Transfer warm milk to the bowl of an electric mixer and sprinkle yeast on top with a teaspoon of sugar (taking a teaspoon out of the ⅓ cup of sugar).
Step Three: Add in eggs, melted butter, and remaining sugar. Mix until well combined with a wooden spoon.
Step Four: Continue with a wooden spoon, stirring in the flour and salt until a dough begins to form.

Step Five: Place the dough hook on the stand mixer and knead the dough until a large ball is formed. The dough should be smooth and only slightly tacky to the touch.
- Pro Tip: If the dough seems too sticky (sticking to the bottom of the mixer and not forming a ball) add 1 tablespoon of flour until a smooth ball is formed. (If you don’t want to use an electric mixer, you can use your hands to knead the dough for 8-10 minutes on a well-floured surface.
- Pro Tip: To know when to stop kneading your cinnamon roll dough, use the windowpane test. This is when you stretch a small ball of dough into a square until it is thin enough for light to pass through the middle without the dough breaking.


Step Six: Transfer the dough to a well-oiled bowl, and cover it with plastic wrap and a warm towel. Allow dough to rise for 1 hour to 1 ½ hours, or until doubled in size. This may be more or less time depending on the humidity and temperature in your home.
- Pro Tip: I like to turn on the oven to the lowest setting for 1-2 minutes. Then turn off the oven and place the dough to rise in there. It normally takes about 30 minutes for the dough to rise. Do not allow the dough to rise too much or your cinnamon rolls will be airy.

Step Seven: After the dough has doubled in size, transfer the dough to a well-floured surface (this prevents sticking) and roll it out into an approximate 18×12 to 20×14-inch rectangle. This shape doesn’t have to be perfect, but the straighter the edges are, the more uniform your cinnamon rolls will be.


Step Eight: While the dough is rising, make the filling. In a medium bowl, combine butter, brown sugar, and cinnamon until the mixture is uniform throughout. It should not have clumps.
Step Nine: Spread the filling all over the rolled-out dough right to the edges using greased hands or a greased spatula. This process can seem difficult but it gets easier as you spread it.

Step Ten: Tightly roll the dough up as tight as you can, starting from the long end. Place the rolls seam-side down, making sure to seal the edges of the dough.

Step Eleven: Cut into 12 even rolls with sewing thread or unflavoured floss. Unflavored dental floss or butcher’s twine cuts through the dough without squishing it flat.

Step Twelve: Place cinnamon rolls in a greased 9×13 inch baking pan in 4 rows of three, evenly spaced. Cover with plastic wrap and a warm towel and let rise again for 30-45 minutes until doubled in size and puffed up.


Step Thirteen: Once the rolls have risen, we’re ready to bake! Remove plastic wrap and towel and pour warmed heavy cream over the top of the rolls, allowing it to soak down in and around the rolls.

Step Fourteen: Bake in an oven preheated to 375ºF for 20-22 minutes until the rolls are lightly golden brown and the center rolls are cooked through and no longer doughy. Allow them to cool for 5-10 minutes before frosting.
- Pro Tip: Baking time varies how big the rolls are, what type of pan, how close the rolls are packed, etc. Check the rolls after 20 minutes. If they are getting too brown, cover loosely with foil for the remaining baking time.


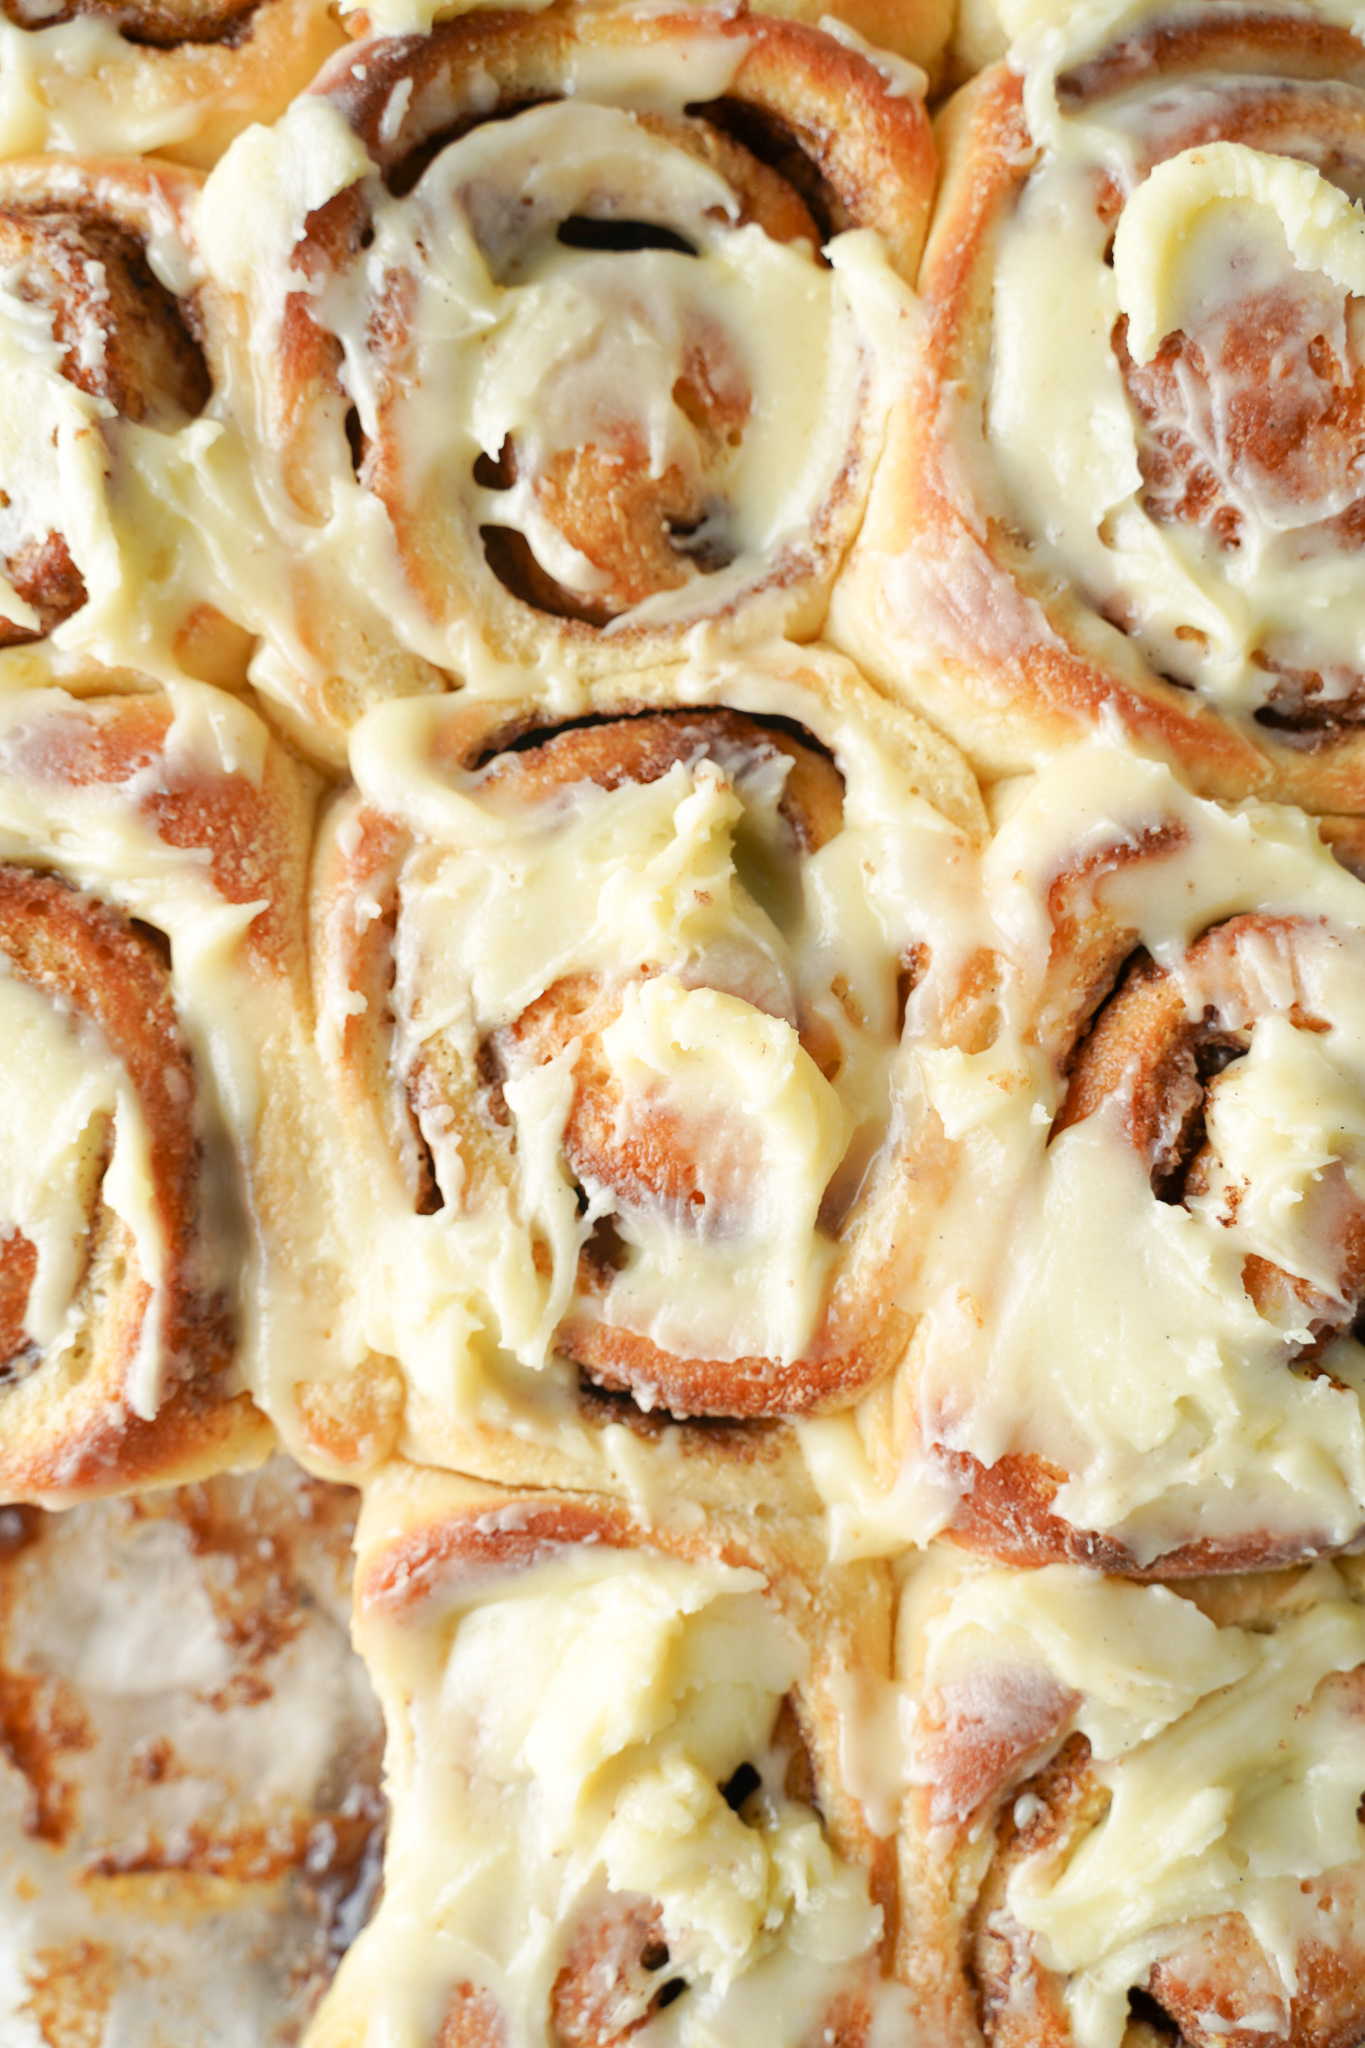
Step Fifteen: While the rolls cool, make the cream cheese frosting. Using a mixer, combine the cream cheese, butter, half the powdered sugar, and vanilla extract. Beat until combined. Then add remaining powdered sugar and beat until smooth and fluffy. Spread the icing evenly over the 12 rolls. Enjoy warm!

Frequently Asked Questions
Yes, you can. Place the rolls into the baking dish and cover the dish in plastic wrap. Store in the refrigerator or freezer overnight. When you’re ready to bake them, let the rolls rest at room temperature for about 45 minutes (still covered). The rolls may not puff up as much. Bake according to the original recipe and serve!
The oven helps the cinnamon roll dough rise even more when baking, but if it is rising unevenly, that could mean some parts of your oven are hotter.
If your cinnamon rolls turn out dense, it’s probably because the yeast has not had time to rise. At Step 2, I let the yeast sit for about 3 minutes. I do it because I believe dissolving the yeast in some milk and sugar will help activate the yeast and get it started.
Heavy cream is the secret ingredient; it makes the rolls rich and gooey!
Optional Toppings & Variations
- Sprinkle baked cinnamon rolls with chopped walnuts or sliced almonds before serving to guarantee a variety of textures in each bite.
- Make your cinnamon rolls extra decadent with a drizzle of honey, maple syrup, or chocolate sauce.
What To Serve With This Recipe
- Fix up a plate of scrambled eggs and fried bacon to complement these cinnamon rolls, making a hearty, satisfying breakfast! Hint: If you’re taking photos, set your plate by window for that natural sunlight. Now it’s all set for a cafe-worthy brunch.
- Fluffy cinnamon rolls will pair well with simple hot drinks, like black coffee, a latte, or freshly brewed English Breakfast. This time, skip the sugar.

Expert Tips & Tricks
- Don’t overheat your milk: Milk should be between 105-115ºF. Anything hotter is likely to kill the yeast, which means the cinnamon rolls will not rise. A simple tip is to dip your finger in the milk – it should feel warm, similar to warm bath water but not hot. If you warmed it up too much, simply wait a few minutes until it cools down enough to touch.
- Use a room temperature egg in the dough: if you use a cold egg, there’s a chance it could affect the yeast or mix with the melted butter and cause it to coagulate. To bring your eggs to room temperature simply place them in a bowl of warm water for a few minutes.
- How much to knead dough: Decided to go the old-fashioned route? You can also knead the dough without a mixer. Though, be careful not to add too much flour. The dough is supposed to be tacky, which is what keeps these rolls soft.
Storage & Reheating Instructions
If you’d prefer to bake these the next morning, follow these instructions:
- After placing the rolls into the baking dish, cover the dish in plastic wrap and store in the refrigerator overnight.
- When you’re ready to bake them the next morning, let the rolls rest at room temperature for about 45 minutes (still covered). The rolls may not puff up as much as they would if they were proofed the day of, but that’s OK. They will still puff up when baked.
- Bake according to the original recipe and serve!
Alternatively, you can also freeze your cinnamon roll dough if you’d like to prepare this recipe a few days or weeks in advance.
Note: Only frost the cinnamon rolls you’re planning on eating. Frosting can get a little weird when it goes through a bunch of temperature changes. I find these cinnamon rolls keep best unfrosted so they don’t get soggy. Simply keep the frosting in a container in the fridge and frost your cinnamon roll when you’re ready to eat it!
Homemade Cinnamon Rolls Recipe
Ingredients
DOUGH
- 1 cup warm milk whole milk or 2% preferred
- 2 ¼ teaspoons quick rise yeast
- 1/3 cup granulated sugar
- 2 large eggs at room temperature
- 1/2 cup salted butter melted (Melted, but make sure it isn't over 110º Fahrenheit. Just softened is fine.)
- 3 cups of bread flour or all-purpose flour spooned & leaveled, plus more as needed for hands/work surface
- 1/4 teaspoon salt
- 1/2 cup heavy cream for pouring over the risen rolls right before baking
FILLING
- 1 cup light brown sugar
- 2 tablespoons ground saigon cinnamon
- 1/2 cup unsalted butter softened
CREAM CHEESE FROSTING
- 6 ounces cream cheese softened
- 1/3 cup salted butter softened
- 2 cups powdered sugar
- 1/2 tablespoon vanilla extract
Instructions
DOUGH
- Warm milk to around 110 degrees F. I like to do this by placing milk in a microwave safe bowl and microwaving it for 40-45 seconds. It should be warm but not hot to the touch (about 105 - 110 degrees F). If it is too hot, make sure to let it cool before adding to the yeast to prevent killing the yeast.
- Transfer warm milk to the bowl of an electric mixer and sprinkle yeast on top with a teaspoon of sugar (taking a teaspoon out of the 1/3 cup of sugar) Let it sit for about 3 minutes. You don’t need to do this step however, I still do this step and believe it is important to dissolve the yeast in a little bit of milk and sugar to help activate the yeast and get it started.
- Add in eggs, melted butter and remaining sugar. Mix until well combined with a wooden spoon.
- Next, continue with wooden spoon stirring in the flour and salt until a dough begins to form.
- Place dough hook on stand mixer and knead dough until a large ball is formed for approximately 8 minutes. The dough should be smooth and only slightly tacky to the touch. If the dough seems too sticky (meaning its sticking to the bottom of the mixer and is not forming a ball, add more flour 1 tablespoon at a time until a smooth ball is formed. (If you don’t want to use an electric mixer, you can use your hands to knead the dough for 8-10 minutes on a well-floured surface).
- Transfer the dough ball to a well-oiled bowl, cover with plastic wrap and a warm towel. Allow dough to rise for 1 hour to 1 ½ hours, or until doubled in size. This may be more or less time depending on the humidity and temperature in your home. Pro Tip: I like to turn on the oven to the lowest setting for 1-2 minutes. Then turn off the oven and place the dough to rise in there. It normally takes about 30 minutes for the dough to rise. Do not allow the dough to rise too much or your cinnamon rolls will be airy.
- After the dough has doubled in size, transfer dough to a well-floured surface and roll out into an approximate 18 X 12 to 20 X 14 inch rectangle. This shape doesn’t have to be perfect, but the straighter the edges are, the more uniform your cinnamon rolls will be.
MAKE YOUR FILLING
- While the dough is rising, make the filing. In a medium bowl, combine butter, brown sugar and cinnamon until mixture is homogeneous (uniform throughout). Set aside.
- Spread the filling all over the dough right to the edges using greased hands or a greased spatula. This process can seem difficult but it gets easier as you spread it.
- Tightly roll dough up as tight as you can, starting from the long end and place seam side down making sure to seal the edges of the dough as best you can.
- Cut into 12 even rolls with sewing thread or unflavoured floss 10-12 inches long.
- Place cinnamon rolls in a greased 9x13 inch baking pan in 4 rows of three, evenly spaced. Cover with plastic wrap and a warm towel and let rise again for 30-45 minutes until doubled in size and puffed up.
- Preheat the oven to 375 degrees F.
- Warm the heavy cream until the chill is off. Don’t make it hot, you just don’t want it cold. It should be warm to the touch.
- Once the rolls have risen, remove plastic wrap and towel and pour the heavy cream over the top of the rolls, allowing it to soak down in and around the rolls.
- Bake at 375 degrees for 20-22 minutes, until the rolls are lightly golden brown and the center rolls are cooked through and no longer doughy. (Note: the time will vary based on how big the rolls are, what type of pan, how close the rolls are packed, etc. They could take up to 25-27 minutes. Check the rolls at 20 minutes. If they are getting too browned, cover loosely with foil for the remaining baking time).
- Allow them to cool for 5-10 minutes before frosting.
MAKE YOUR FROSTING
- While the rolls cool, make the cream cheese frosting. In a stand mixer fit with the whisk attachment or hand mixer combine the cream cheese, butter, half of the powdered sugar and vanilla extract. Beat until combined.
- Then add remaining powdered sugar and beat until smooth and fluffy. Spread the icing evenly over the 12 rolls. Enjoy warm!


0 Comments